❑ @Component, @Autowired를 이용한 DI
최근에는 Spring Bean Configuration(DI 지시서)를 xml로 작성하는 경우는 거의 없다. 본 포스팅에서는 @Component, @Autowired 등 어노테이션을 각 객체에 직접 이용해 의존성 주입(DI) 하는 방법을 알아본다.
참고로, java class 형식으로 Spring Bean Configuration을 작성해 의존 관계를 정의할 수도 있다. 해당 내용은 추후 포스팅할 예정이다.
1) 어노테이션(Annotation)을 이용할 때의 장점
- 어노테이션을 사용하면 xml을 변경하지 않고 @Component, @Autowired, @Qualifier 등의 어노테이션만을 추가해서 DI를 바꿔줄 수 있다.
- 즉, 소스코드도 변경이 없으며(어노테이션의 변경은 소스코드의 변경이 아니다) xml파일을 열어서 수정할 필요도 없으므로 더 편리하다
2) @Component: Spring Bean 객체를 생성하는 어노테이션
객체에 @Component 어노테이션을 사용하면 Spring은 Bean으로 등록하는 것으로 판단한다. xml에서의 <bean> 태그와 동일하다고 보면 된다.
@Component 사용하기
Client 객체: Car
package com.test.ui;

@Component
// @Component("carBean") // id를 직접 입력할 때
public class Car {
    private PowerUnit powerUnit; // Dependency

    public Car(PowerUnit powerUnit) {
        this.powerUnit = powerUnit; // 생성자를 통한 외부 주입(Injection)
    }
}
의존 객체: ElectricMotor
@Component
// @Component("electricMotorBean") // id를 직접 명시 할때
public class ElectricMotor implements PowerUnit {
    @Override
    public void printPowerType() {
        system.out.println("ElectricMotor");
    }
}- 의존 관계: Car → ElectricMotor
- 객체를 생성할 Class인 SalesCalculator에 @Component 어노테이션을 명시함으로써 간단히 생성할 수 있다.
- <bean> 태그에서 id 속성을 사용한 것 처럼 id를 명시하고 싶을 때 @Component("id 명시")와 같이 사용한다.
- 이렇게 Spring은 Bean 객체로 등록할 것임을 @Component를 보고 파악하는데, 프로젝트가 빌드될 때 각 클래스 마다 @Component가 있는지 확인하는 작업을 컴포넌트 스캔이라고 한다.
3) @Autowired: 의존성 주입하기
@Autowired는 의존 관계를 맺어주는(의존성을 주입해주는) 어노테이션이다. xml 형식에서 <property> 태그와 ref 속성을 이용했던 의존 관계 설정을 @Autowired로 대체하는 것이다.
@Autowired 사용하기
package com.test.ui;

@Component
// @Component("carBean") // id를 직접 입력할 때
public class Car {
    private PowerUnit powerUnit; // Dependency

    @Autowired
    public Car(PowerUnit powerUnit) {
        this.powerUnit = powerUnit; // 생성자를 통한 외부 주입(Injection)
    }
}- 생성자 위에 @Autowired를 어노테이션을 달아준다. 이렇게 하면 Spring이 자동으로 IoC 컨테이너에 등록된 Bean 객체 중 PowerUnit 구현체를 찾아 주입해준다.
- @Autowired의 위치가 지금은 생성자 위에 있지만 이 외에도 setter, 필드(calculator 정의 부분) 위에 위치할 수 있다.
[참고] Require 옵션: @Autowired(required = true or false)
- true
주입하고자 하는 bean이 IoC 컨테이너에 없으면 컴파일 에러. true가 default. - false
IoC 컨테이너에 없으면 의존성 주입하지 않고 컴파일 진행. 이 때 주입되어야 할 의존성은 null로 남아있다.
4) 특화된 @Component 어노테이션 (@Service/@Repository/@Controller/@RestController)
@Controller, @Service, @Repository
- @Controller, @Service, @Repository는 @Component는 특별한 Case지만 사실상 똑같다. 각각의 정의를 들어가면 @Component가 정의되어 있는 것을 확인할 수 있다.
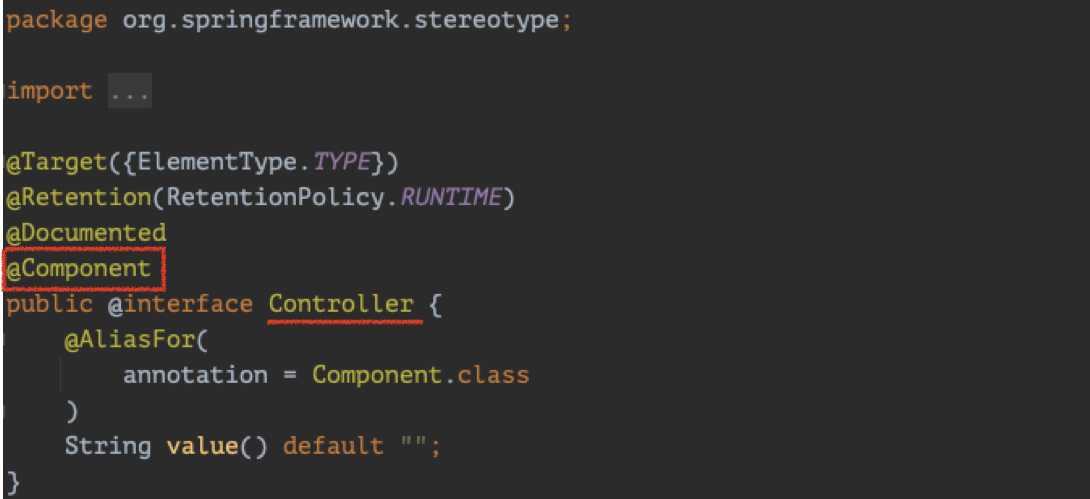
- 그럼에도 나눈 이유는 MVC 패턴에서 Controller 객체, Service 객체, Repository 객체의 역할로 구분해 개발하는 것이 정형화 되어있고 의미론적으로 "이 클래스의 역할은 Controller다"라는 쓰임과 용도를 부여하기 위해 @Controller(@Service, @Repository)를 사용하는것이다.
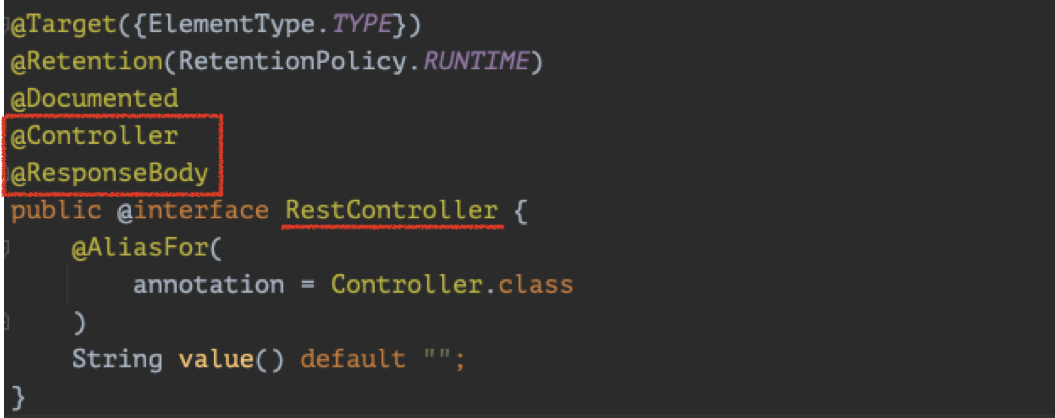
@RestController,
- @RestController는 @Controller의 특수한 케이스로 해당 객체가 API Controller임을 명시적으로 알리고, API 개발 시 반드시 필요한 @ResponseBody를 포함시킨 것이다.
[참고] xml 형식의 Spring Bean Configuration과 함께 사용하기
기존에 작성된 xml 형식의 Spring Bean Configuration이 있어 함께 사용해야할 경우가 있다. 이럴 경우 xml 내에 어노테이션과 컴포넌트 스캔을 함께 사용하고 있음을 명시해준다.
Step1. SpringConfig.xml(생성자 DI편 작성 내용)에 <annotaion-config> 추가
<?xml version="1.0" encoding="UTF-8"?>
<beans xmlns="http://www.springframework.org/schema/beans"
    xmlns:xsi="http://www.w3.org/2001/XMLSchema-instance"
    xmlns:p="http://www.springframework.org/schema/p"
    xmlns:context="http://www.springframework.org/schema/context" // namespace:p 추가
    xsi:schemaLocation="http://www.springframework.org/schema/beans http://www.springframework.org/schema/beans/spring-beans-3.0.xsd">

    <context:annotation-config />
    <context:component-scan base-package="com.test, 패키지 위치2, ..." />;

    ...

</beans>- annotation-config
- namespace context 추가
클래스에 @Autowired라는 어노테이션을 사용해 DI를 하기 위해선 Spring에게 xml을 읽을 때 어노테이션이 함께 사용되었음을 알릴 수 있는 xmlns:context="http://www.springframework.org/schema/context" 를 속성을 <beans> 태그에 추가해준다. - <context:annotation-config /> 태그 추가
추가한 context를 이용해 본 xml 문서가 각 Bean 객체에 어노테이션을 함께 사용하고 있음을 Spring에게 알린다.
- namespace context 추가
- component-scan
- <component-scan> 태그를 사용해 컴포넌트 스캔을 사용할 것임을 Spring에 알린다. Spring은 이를 보고 @Component 어노테이션이 명시되었는지 확인한다
- base-package는 컴포넌트 스캔의 시작 위치를 명시한다. 시작 위치부터 하위 패키지를 전부 스캔한다.
- base-package에 콤마를 사용해 시작 위치를 여러개 명시할 수 있다
- 참고로 <component-scan> 태그를 사용하면 @Component 클래스 내부를 확인하기 때문에 @Autowired 등의 설정도 같이 확인하게 된다. 따라서 <context:annotation-config /> 태그는 사용하지 않아도 된다.
'Back-End > Spring' 카테고리의 다른 글
| [Spring] Annotation을 이용한 DI (2) @AutoWired와 @Qualifier (0) | 2022.02.02 |
|---|---|
| [React, Spring] 서버에 MultipartFile 업로드(Axios POST 사용) (0) | 2022.01.26 |
| [Spring] Collection Bean 생성하기 - XML Config (0) | 2021.12.14 |
| [Spring] IoC 컨테이너 사용하기 - XML Config (0) | 2021.08.19 |
| [Spring] 값(Value) 주입 설정 방법 - XML Config (0) | 2021.07.24 |